In short: to iron a shirt without damaging it, start with the collar, then the cuffs, sleeves, shoulders, front panels, and finally the back. The real time-saver is not just technique: a shirt removed promptly from the dryer while still pliable and hung on a hanger irons far more easily. The iron symbol on the care label is always your reference for temperature.
At a Glance
Reliable order -- collar, cuffs, sleeves, shoulders, front panels, back.
Temperature = iron symbol -- one dot low, two dots medium, three dots high.
Slightly damp shirt -- much easier to de-wrinkle than a bone-dry one.
Hang immediately -- a hanger prevents new creases right after ironing.
Quick Answer: How to Iron a Shirt Properly
The most effective approach is to iron a clean, still-slightly-damp shirt in a fixed order: collar, cuffs, sleeves, shoulders, front panels, then back. This sequence prevents you from refolding a large surface you have already pressed just to reach a small area you missed.
Most competing guides list the same steps but overlook a decisive point: a badly dried shirt left crumpled in a ball takes twice as much effort to iron. Good ironing really starts before you even switch the iron on.
Ironing starts at the dryer
A shirt pulled from the tumble dryer while still warm and hung on a hanger straight away holds far fewer creases than one stuffed into a basket. That is one of the real advantages of careful drying at a laundromat: less time wasted at the ironing board later. To reduce wrinkles at source, see also our drying guide.
Before You Start: 4 Settings That Change Everything
Read the care label
The iron symbol takes precedence over guesswork. One dot = low heat, two dots = medium, three dots = high. If the iron is crossed out, do not iron.
Steam yes, soaked fabric no
A slightly damp shirt de-wrinkles better. Too wet and it marks under the soleplate and dries poorly.
Remove collar stays if applicable
On some dress shirts, remove the collar stays before ironing to avoid bending them or creating a bump under the fabric.
Clean soleplate
A dirty soleplate leaves marks and snags the fabric. Check it especially before ironing a light-coloured shirt.
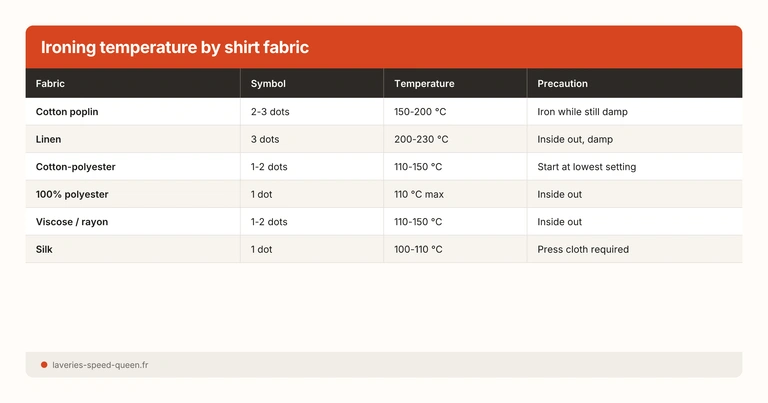
Ironing Temperature by Fabric: The Complete Chart
Getting the temperature right is the single most important factor in avoiding scorch marks or a shiny finish. Here is the detailed guide by fabric type.
| Shirt Fabric | Iron Symbol | Temperature | Steam | Precaution |
|---|---|---|---|---|
| Cotton poplin / oxford | 2-3 dots | 150-200 °C | Yes, generous | Iron while still damp for the best result |
| Linen | 3 dots | 200-230 °C | Yes, maximum | Iron damp, on the reverse. Accept some residual creasing |
| Cotton-polyester blend | 1-2 dots | 110-150 °C | Moderate | Start at the lowest setting, increase if needed |
| 100 % polyester | 1 dot | 110 °C max | Little or none | Iron on the reverse — risk of shine if too hot |
| Viscose / rayon | 1-2 dots | 110-150 °C | Moderate | Iron on the reverse — fabric develops shine easily |
| Silk | 1 dot | 100-110 °C | No (water spots) | Press cloth required, or hold steamer at a distance |
| Cotton flannel | 2 dots | 150 °C | Yes | Light pressure to avoid flattening the texture |
| Chambray / light denim | 2-3 dots | 150-200 °C | Yes | Iron on the reverse to preserve the colour |
For the official iron-symbol meanings, see also our guide to care label symbols.
The Order That Actually Works
With a shirt, the order matters as much as the temperature.
1. Collar
Open the collar flat. Iron the inside first, then the outside, without pressing so hard that you create shine on the edge.
2. Cuffs
Unbutton and lay them flat. Start with the inside, then the outside -- same approach as the collar.
3. Sleeves
Align the seam to avoid a twisted crease. If you dislike a sharp centre crease, iron gently without pressing the fold line.
4. Shoulders
Use the narrow end of the board to follow the curve of the yoke without creating a fold near the collar.
5. Front panels then back
Go around the buttons instead of pressing the soleplate over them, then finish with long, steady strokes on the back.
Zone-by-Zone Method
1. Collar and collar band
The collar must be crisp without looking shiny.
Iron it open, reverse side first, then the front. If the shirt is formal, lightly reshape the collar fold with your fingers at the end — not with heavy iron pressure.
Tip: for a perfectly crisp collar, iron from each tip towards the centre (not the other way round). This prevents a ridge forming in the middle.
2. Cuffs
Lay the cuff open and flat. Avoid pressing directly on the buttons or over the thicker seam areas. On a dress shirt, several light passes work better than one heavy press that marks the zone.
French cuffs (double cuffs): open the cuff completely, iron it flat, then fold it back aligning the holes for the cufflinks. Never iron a French cuff while folded.
3. Sleeves
The main difficulty is alignment. Lay the sleeve flat, matching the bottom seam with the edge. Iron one side, flip, then do the other. If you want a sleeve without a sharp centre crease, keep lighter pressure down the middle and focus on the edges.
4. Shoulders and yoke
Slide the shirt over the narrow end of the board and rotate it gradually. This is the zone most guides gloss over, yet it is what gives the “properly finished shirt” look. Work from the centre of the yoke outwards towards each shoulder.
5. Front panels and back
Start with the button panel, going around each button. Do the other side, then open the back out fully so you finish without folding sections you have already smoothed.
Placket tip: iron the placket from the reverse side to avoid the buttons entirely. It is faster and neater than weaving between buttons on the front.
Ironing Without an Iron: 5 Alternatives That Work
No alternative is as precise as a real iron on the collar and cuffs, but several methods are good enough for a lightly creased shirt.
1. Garment steamer
The garment steamer is the most effective alternative to a traditional iron. It sends a jet of steam that relaxes the fibres without touching the fabric. Very good on the body of the shirt, shoulders, and back. Less effective on the collar and cuffs where the precision of an iron is missed. Entry-level price: $30-50.
2. Tumble dryer + immediate hanger
Remove the shirt from the dryer while still warm and hang it on a hanger straight away. Smooth the fabric by hand. The residual heat and the weight of the fabric eliminate most wrinkles. This method works particularly well with cotton-polyester shirts.
3. Bathroom steam
Hang the shirt on a hanger in the bathroom during a hot shower. The ambient steam relaxes the fibres and reduces light creases. Results are uneven on deep wrinkles, but sufficient for a casual shirt.
4. Wrinkle-release spray
Wrinkle-release sprays (such as Downy Wrinkle Releaser) soften the fibres when you spray and then smooth by hand. Effective for light creases and last-minute touch-ups. Not a replacement for a full ironing session.
5. Weight and gravity
Place the shirt under a heavy, flat object (books, mattress) overnight. The pressure removes wrinkles on flat areas (back, front panels). Ineffective on technical zones (collar, sleeves).
| Method | What It Does Well | Limitation | Cost |
|---|---|---|---|
| Garment steamer | Very good on the shirt body and light creases | Less crisp than an iron on the collar | $30-50 |
| Tumble dryer + immediate hanger | Greatly reduces wrinkles before storing | Does not replace a proper final ironing | Cost of the dryer cycle |
| Bathroom steam | Gently relaxes a lightly creased shirt | Uneven results, slow | Free |
| Wrinkle-release spray | Quick touch-up, handy for travel | Deep creases remain visible | $5-10 |
| Weight / gravity | Smooths flat zones (back, front panels) | Ineffective on collar and sleeves | Free |
Folding vs Hanging: How to Store Without Creasing
Storage is the last link in the chain. Poor storage undoes all your ironing work.
Hanging on a hanger: the best option
The most reliable method for keeping a shirt wrinkle-free. Button at least the top button (the collar button) so the shirt stays in place on the hanger. A slim wooden or plastic hanger is fine — no need for a wide suit hanger.
Advantage: no fold lines; the fabric stays smooth. Limitation: takes more wardrobe space.
Folding: the crease-free technique
For packing in a suitcase or storing in a drawer, proper technique matters:
- Button all the buttons, lay the shirt face down
- Fold one third of the back towards the centre, folding the sleeve along the body
- Repeat on the other side (the shirt now forms a rectangle)
- Fold the bottom up, adjusting the length to the desired format
- Flip over: the shirt presents the collar and front
Travel tip: roll the shirt instead of folding it to reduce creases further. Rolling distributes pressure evenly.
Shirts at the Laundromat: Choosing the Right Programme
The right wash programme at a laundromat directly affects how hard the shirt is to iron afterwards. A well-washed, well-dried shirt irons twice as fast.
Delicate programme: fewer wrinkles at source
At a Speed Queen laundromat, choose a delicate programme at 30-40 °C with a moderate spin (600-800 rpm). A high spin (1,200 rpm) compresses the fabric and creates deep creases that require extra effort at the ironing board. See our guide to washing temperatures for help choosing the right setting.
Drying: the key to easy ironing
Transfer the shirt from the washing machine to the dryer immediately. A short cycle at medium heat is enough. Remove the shirt while still slightly damp (not bone dry) and hang it on a hanger straight away. This single step can cut ironing time in half.
If you prefer not to use a dryer, see our article on drying laundry indoors without humidity problems.
”Easy iron” shirts at the laundromat
Shirts treated as “non-iron” or “easy iron” (resin-treated cotton, cotton-polyester) come out virtually smooth from the dryer if removed immediately. At a laundromat, the combination of a delicate programme + short drying cycle + immediate hanger can make ironing unnecessary for these shirts.
What Saves Time Before the Iron
Do not leave the shirt crumpled in a heap
A shirt forgotten at the bottom of a basket always irons worse than one hung on a hanger right after drying.
Remove it quickly from the dryer
If the care label allows tumble drying, take the shirt out as soon as the cycle ends and put it on a hanger. The residual heat helps smooth the fabric naturally.
Button at least the top button
After ironing, the hanger holds the shape better if the collar is lightly closed.
Use steam sparingly
Steam helps relax the fibres, but a soaking wet shirt under the iron quickly becomes counterproductive.
Common Mistakes
- Ironing too hot out of habit -- the surest way to create shine on fabric or scorch a synthetic.
- Starting with the back -- you will have to refold the shirt and undo the work you already did.
- Pressing over buttons -- go around them; never place the soleplate directly on top.
- Waiting until the shirt is bone dry and crumpled -- that is when ironing becomes endless.
- Storing without a hanger right after ironing -- creases return fast if the shirt is folded while still warm.
- Ironing a dirty shirt -- the heat from the iron sets sweat stains and makes them permanent.
- Forgetting to check the soleplate -- a dirty soleplate leaves streaks on light fabric.
When the Dry Cleaner Is Still Useful
This page covers ironing a washable shirt. If your need is mainly a high-end structured shirt, a suit, or a garment with professional-cleaning-only instructions, also read our guide to dry cleaning and its alternatives and our laundromat vs dry cleaner comparison. For washing the suit itself, see our guide to washing a suit in a machine.
Alternatives to Traditional Ironing
If the iron is not your favourite chore, several alternatives give an acceptable result without the hassle of traditional ironing.
The vertical garment steamer is the most popular solution. Hang the shirt on a hanger, run the steamer 2-3 cm from the fabric while pulling the bottom of the shirt gently to keep it taut. The result is not as sharp as a proper iron job, but it is good enough for everyday wear. Expect 2-3 minutes per shirt versus 5-7 minutes with a traditional iron.
The tumble-dryer trick is even faster: put the wrinkled shirt in the dryer with a damp flannel. Run a 10-minute cycle on medium heat. The steam from the damp flannel relaxes the shirt. At a laundromat, this technique works perfectly with professional dryers — remove the shirt immediately after the cycle and hang it on a hanger.
Methodology and Sources
- GINETEX / ISO 3758:2023 defines the iron-symbol levels and states that the ironing temperature must follow the care label, not general habit.
- Practical ironing-order recommendations cross-reference major manufacturer guides (Rowenta, Conair, Sunbeam), enriched here with a preparation/drying angle that competing results rarely cover.
Sources and References
- GINETEX - Textile care symbols (ISO 3758:2023) (lien externe)
- Rowenta - How to iron a shirt (lien externe)
- Drying guide
- Care label symbols guide
- Washing temperatures
- Washing a suit in a machine
- Drying laundry indoors
As an Amazon Associate, we earn a small commission on purchases made through the affiliate links in this article — at no extra cost to you. This helps us maintain this site and produce free guides.
A well-dried shirt needs less ironing. Our laundromats in Blagnac, Croix-Daurade and Montaudran let you go straight from washing to drying without leaving your laundry crumpled in a heap. Check our prices, then keep this method handy for any remaining creases.