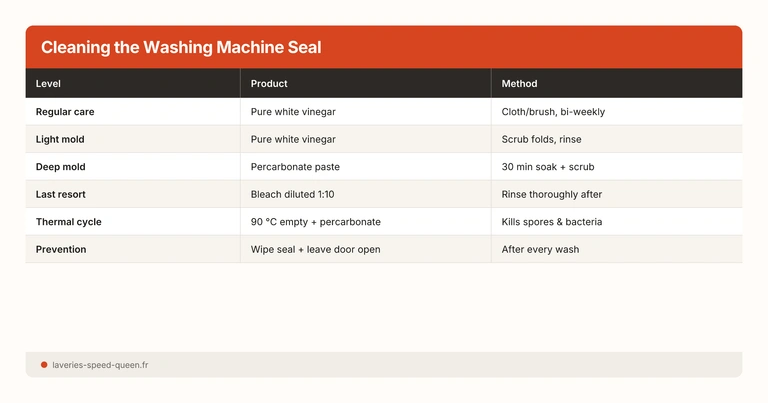
In short: the washing machine door seal (gasket) goes mouldy because of standing water trapped in its folds. Routine cleaning: white vinegar + toothbrush. Ingrained mould: sodium percarbonate paste (30-minute soak). Prevention: wipe the seal and leave the door open after every cycle. Last resort: diluted bleach (1:10), rinse thoroughly.
At a Glance
Standing water = mould — the seal folds trap water after every cycle, feeding fungal growth.
White vinegar + toothbrush — sufficient for fortnightly maintenance and light mould.
Sodium percarbonate — as a paste for stubborn black mould; the active oxygen penetrates the biofilm.
Leave the door open after every cycle — the single most effective prevention step.
Clean every two weeks — or monthly if you wipe the seal after every wash.
Why the Washing Machine Seal Goes Mouldy
The door seal (also called the gasket or bellows) is an EPDM rubber ring that creates a watertight barrier between the door and the drum. Its U-shaped profile creates deep folds that consistently trap water after every wash cycle. This standing water, combined with three factors, creates an ideal breeding ground for mould.
The Three Factors Behind Mould Growth
Standing Water
The seal folds retain 10-30 ml of water after every cycle. This water sits in the rubber folds and will not evaporate if the door stays closed. Within 24-48 hours, airborne fungal spores colonise this water.
Detergent Residue and Sebum
Unrinsed detergent residue, textile fibres, sebum and dead skin cells settle in the seal with every wash. These residues are nutrients for mould — they provide the organic carbon needed for fungal growth.
Residual Heat
After a warm cycle (40-60 °C), the temperature inside the drum drops slowly. The combination of heat and moisture in the first hours after washing is exactly what mould prefers: a perfect incubator.
The Moulds Living in Your Seal
The most common species are Cladosporium (black-green), Aspergillus niger (deep black), Penicillium (blue-green) and Aureobasidium (pink-black). They form a biofilm — a protective mucilaginous layer that makes them resistant to simple wiping and even to vinegar once well established.
Routine Cleaning: White Vinegar + Toothbrush
For regular maintenance (fortnightly) or light mould (grey traces, pink film), white vinegar↗ is all you need.
Open the door and pull back the seal folds — examine the inside of each fold with your fingers. It is usually the bottom fold (6 o'clock position) where the most water collects.
Soak a cloth in undiluted white vinegar (8 %) — standard supermarket white vinegar works perfectly.
Scrub the inside of each fold — for tight spots, an old toothbrush soaked in vinegar is ideal.
Focus on the black areas — scrub in circular motions; vinegar dissolves limescale and weakens surface mould.
Rinse with a damp cloth — wipe away residual vinegar and loosened mould.
Dry with a dry cloth — do not leave any water in the folds after cleaning.
White vinegar is a weak acid (acetic acid, pH approx. 2.5) that dissolves limescale deposits and kills some surface mould. It is safe for the EPDM rubber of the seal with regular use.
Stubborn Black Mould: Sodium Percarbonate
When vinegar is not enough — deep black mould, thick biofilm, stains that will not shift with scrubbing — sodium percarbonate is the next step.
Why Percarbonate Is More Effective
Sodium percarbonate (2Na2CO3·3H2O2) releases active oxygen (hydrogen peroxide) on contact with warm water. This active oxygen:
- Penetrates the fungal biofilm — where vinegar only slides over the surface.
- Oxidises the black pigments of the mould — bleaching the stains.
- Destroys the fungal hyphae (mould filaments) through oxidation.
The Percarbonate Paste Method
- Mix 2 tablespoons of sodium percarbonate with a little warm water (40-50 °C) to form a thick paste.
- Apply the paste to the mouldy areas of the seal, pushing it into the folds.
- Leave for 30 minutes to 1 hour — the active oxygen works progressively.
- Scrub with a toothbrush or non-abrasive sponge.
- Rinse thoroughly with a damp cloth.
- Dry with a dry cloth.
Percarbonate vs Baking Soda
Do not confuse sodium percarbonate with baking soda (bicarbonate of soda). Baking soda (NaHCO3) is a mild abrasive and deodoriser — it has no fungicidal action. Sodium percarbonate (Na2CO3·H2O2) releases active oxygen that destroys mould. It is percarbonate you need to treat a mouldy seal.
Last Resort: Diluted Bleach
If the mould resists percarbonate (rare cases, usually on seals left uncleaned for years), bleach is the most powerful fungicide available to consumers.
Essential Precautions
- Dilution: 1 part bleach to 10 parts water. Concentrated bleach attacks rubber.
- Ventilation: open the window in the room.
- Gloves: wear rubber gloves — bleach irritates skin.
- Never mix vinegar and bleach — the reaction produces chlorine gas, a toxic gas. If you have used vinegar beforehand, rinse thoroughly and wait before applying bleach.
- Limit contact time: 15-20 minutes maximum. Rinse thoroughly afterwards.
- Never mix vinegar and bleach — produces chlorine gas (Cl2), toxic when inhaled.
- Concentrated bleach on rubber — oxidises the polymers, making the seal porous and brittle over time.
- Bleach on coloured seals — irreversibly discolours tinted rubber.
- Frequent bleach use — reserve it for extreme cases, not routine maintenance.
The Hot Empty Cycle: Full Circuit Clean
After manual cleaning of the seal, follow up with a hot empty cycle to disinfect the entire circuit (drum, hoses, pump).
- Empty drum — no laundry.
- Add 2 tablespoons of sodium percarbonate directly into the drum.
- Run the hottest cycle available (90 °C ideally, 60 °C minimum).
- Select the longest cycle to maximise contact time.
This cycle combines thermal action (90 °C kills mould and bacteria) with chemical action (percarbonate) for a thorough clean. For a detailed guide to cleaning the entire machine, see our article on how to clean a washing machine.
Prevention: 3 Daily Habits
Prevention is infinitely more effective than curative cleaning. Three simple steps after every cycle are enough to stop mould from taking hold.
1. Wipe the Seal After Every Cycle
Take a dry cloth and run it through the seal folds to absorb residual water. This takes 10 seconds and eliminates the number one cause of mould: standing water. Focus on the bottom fold (6 o’clock position) where water collects by gravity.
2. Leave the Door Ajar
After washing, leave the machine door ajar (not wide open if space is limited — 10 cm is enough). Circulating air dries residual moisture in the drum and seal within 2-4 hours. A closed door traps moisture and creates a mould incubator.
3. Remove Laundry Immediately
Wet laundry in a closed drum triples the duration of moisture inside the machine. Remove laundry as soon as the cycle ends. If you cannot be present, use the delay start function so the cycle finishes when you return.
The Detergent Drawer Too
The detergent drawer is another often-forgotten mould hotspot. Remove it regularly (it unclips), clean it with white vinegar, and leave it ajar after every wash. Damp detergent residue in a closed drawer goes mouldy just like the seal.
Zone-by-Zone Cleaning: The Seal in Detail
The washing machine seal is not uniform — some zones are more problematic than others.
Bottom Fold (6 O'Clock)
The most critical zone. Water collects here by gravity after every cycle. This is always where mould appears first. Check and wipe this zone as a priority. Pull the fold apart with your fingers — you will often find a small pool of residual water, textile fibres and detergent residue.
Side Folds (3 and 9 O'Clock)
Less affected than the bottom fold, but water settles here too. On machines with heavy loads, the pressure of laundry against the door pushes water into these side folds. Clean them at the same frequency as the bottom fold.
Top Fold (12 O'Clock)
Rarely affected by standing water (gravity works in its favour), but detergent splashes and spray settle here. Clean it during your regular fortnightly maintenance.
Rear Face of the Seal (Drum Side)
The face of the seal that touches the drum is harder to reach. Pull the seal towards you to see this face. If mould has established itself here, it is often more stubborn — use percarbonate paste and a toothbrush to reach this zone.
Recommended Maintenance Frequency
| Action | Frequency | Duration | Product |
|---|---|---|---|
| Wipe the seal + leave door open | After every cycle | 10 seconds | Dry cloth |
| Full clean (vinegar + brush) | Every 2 weeks | 5-10 minutes | White vinegar |
| Hot empty cycle | Monthly | 1h30-2h (automatic) | Sodium percarbonate |
| Intensive clean (percarbonate paste) | If mould is visible | 30-45 minutes | Sodium percarbonate |
| Bleach treatment (last resort) | If percarbonate is not enough | 20-30 minutes | Diluted bleach 1:10 |
This maintenance fits into a broader programme of descaling and complete washing machine cleaning.
When to Replace the Seal
Cleaning has its limits. Certain signs indicate the seal needs replacing:
- Mould that returns within days despite thorough cleaning and rigorous prevention — the mould has colonised the porous structure of the rubber.
- Visible cracks or cracking — aged rubber loses its elasticity and splits.
- Leaks around the door — the seal is no longer doing its sealing job.
- Hardened rubber — press the seal between your fingers. A healthy seal is supple; an end-of-life seal is rigid.
- Deformation — the seal no longer returns to its original position after washing.
Replacement Cost
- Part only: 30 to 80 euros depending on the brand and model (seals are specific to each machine reference).
- Labour: 50 to 100 euros if you call a technician.
- DIY replacement: possible for handy people — the seal is held by two clamp rings (one on the tub side, one on the body side). Allow 30-45 minutes.
The Seal: A Sign of Overall Maintenance
A mouldy seal is often a symptom of inadequate maintenance of the machine as a whole. If your seal is black, there is a strong chance the drum, hoses and detergent drawer are too.
Drum — run a 90 °C empty cycle with sodium percarbonate once a month.
Detergent drawer — remove it and clean it with white vinegar regularly.
Drain filter — open it and clean it every 2-3 months (coins, fibres, debris).
Descaling — essential in hard-water areas. See our descaling guide.
Professional Laundromats: Industrial-Grade Maintenance
In self-service laundromats, seal and machine maintenance is handled by professional technicians using industrial cleaning protocols. Professional Speed Queen machines, for example, are built with industrial-grade rubber seals and an optimised drainage system that limits standing water. This is worth considering for people who lack the time or inclination to maintain a domestic machine.
Mistakes to Avoid
- Mixing vinegar and bleach — produces chlorine gas (Cl2), toxic. Never use both at the same time.
- Using undiluted bleach — destroys rubber within a few applications. Always dilute 1:10.
- Scrubbing with an abrasive sponge — scratches the rubber and creates micro-cavities where mould establishes itself even more easily.
- Ignoring the bottom fold — this is the number one mould zone, the one many people forget to check.
- Closing the door straight after washing — traps moisture and creates a perfect incubator for fungi.
- Relying on baking soda alone — it deodorises but does not kill mould. Percarbonate is the active agent.
- Neglecting the detergent drawer — this is the second mould hotspot in the machine, often forgotten.
When to Replace the Seal Rather Than Clean It
There comes a point when cleaning is no longer enough. The door seal is a wear part — after 5-8 years of heavy use, it can deteriorate beyond recovery.
Signs that replacement is needed: black mould traces that persist despite cleaning with undiluted vinegar and a 90 °C cycle, a seal that has lost its elasticity (it no longer snaps back into position when you open the door), visible micro-cracks on the inner surface, or a musty smell that returns consistently 2-3 days after every clean.
The cost of replacement (part + labour) ranges from 80 to 150 euros depending on the machine model. This is a reasonable investment compared to the cost of a new machine. If you are handy, the part alone costs 20-50 euros and numerous video tutorials explain the step-by-step disassembly for the most common models.
As an Amazon Associate, we earn a small commission on purchases made through the affiliate links in this article — at no extra cost to you. This helps us maintain this site and produce free guides.
In our laundromats in Blagnac, Croix-Daurade and Montaudran, machine maintenance is handled by our technicians. Seals, drums and circuits are cleaned regularly following a professional protocol. You wash your laundry in clean, well-maintained machines. Payment contactless card or cash. See our prices.
Sources and References
- How to clean a washing machine: complete guide
- How to descale a washing machine
- Sodium percarbonate and laundry
- White vinegar: uses and limits
- Baking soda and laundry
- How to remove a mould stain
- Fungal growth in enclosed damp environments — Cladosporium and Aspergillus niger colonise rubber surfaces within 24-48 hours given standing water + organic nutrients
- Active oxygen release by sodium percarbonate (2Na2CO3·3H2O2) on contact with warm water — oxidation of fungal biofilms